环境:centos7.6两台
cluster:server1:192.168.6.10
node:node1:192.168.6.11
1、配置yum源:
[elasticsearch]
name=Elasticsearch repository for 7.x packages
baseurl=https://artifacts.elastic.co/packages/7.x/yum
gpgcheck=0
gpgkey=https://artifacts.elastic.co/GPG-KEY-elasticsearch
enabled=1
autorefresh=1
2、安装
yum -y install elasticsearch
两台都安装,操作相同。
3、配置
主节点配置:
[root@server1 ~]# cat /etc/elasticsearch/elasticsearch.yml | grep -v "#" | grep -v "^$"
cluster.name: cluster1
node.name: s1
path.data: /var/lib/elasticsearch
path.logs: /var/log/elasticsearch
network.host: 192.168.6.10
discovery.seed_hosts: ["s1"]
cluster.initial_master_nodes: ["s1"]
从节点配置:
[root@node1 ~]# cat /etc/elasticsearch/elasticsearch.yml | grep -v "#" | grep -v "^$"
cluster.name: cluster1
node.name: n1
path.data: /var/lib/elasticsearch
path.logs: /var/log/elasticsearch
network.host: 192.168.6.11
http.port: 9200
discovery.seed_hosts: ["s1", "n1"]
[root@node1 ~]#
有坑的地方:
cluster.name:如果要加入到同一个集群里面这里一定要填写相同的集群名字,如果填写错误会出现始终配对不成功的提示,在日志中可以看到,解决办法是删除集群的所有配置信息,集群的配置信息默认在:
[root@server1 elasticsearch]# pwd
/var/lib/elasticsearch
[root@server1 elasticsearch]# ls
nodes
[root@server1 elasticsearch]#
将nodes删掉重启服务就可以了。
4、查看验证
正常启动服务后用浏览器打开:192.168.6.10:9200
systemctl start elasticsearch //启动服务
[root@centos ~]# curl http://192.168.6.10:9200
{
  "name" : "node-1",
  "cluster_name" : "test",
  "cluster_uuid" : "L6wwWSZZRyil6CUukEGYYw",
  "version" : {
    "number" : "7.3.1",
    "build_flavor" : "default",
    "build_type" : "tar",
    "build_hash" : "4749ba6",
    "build_date" : "2019-08-19T20:19:25.651794Z",
    "build_snapshot" : false,
    "lucene_version" : "8.1.0",
    "minimum_wire_compatibility_version" : "6.8.0",
    "minimum_index_compatibility_version" : "6.0.0-beta1"
  },
  "tagline" : "You Know, for Search"
}
浏览器后面加个参数:192.168.6.10:9200/_cluster/health?pretty
[root@centos ~]# curl http://192.168.6.10:9200/_cluster/health?pretty
{
  "cluster_name" : "test",
  "status" : "yellow",
  "timed_out" : false,
  "number_of_nodes" : 1,
  "number_of_data_nodes" : 1,
  "active_primary_shards" : 43,
  "active_shards" : 43,
  "relocating_shards" : 0,
  "initializing_shards" : 0,
  "unassigned_shards" : 4,
  "delayed_unassigned_shards" : 0,
  "number_of_pending_tasks" : 0,
  "number_of_in_flight_fetch" : 0,
  "task_max_waiting_in_queue_millis" : 0,
  "active_shards_percent_as_number" : 91.48936170212765
}
可以看到当前集群的节点。
5、安装elasticsearch-head插件
在任一节点上安装Elasticsearch-head插件:这里采用git方式安装:此插件可不安装,非必要插件
[root@server1 ~]# git clone git://github.com/mobz/elasticsearch-head.git
[root@server1 elasticsearch-head]# cd elasticsearch-head
[root@server1 elasticsearch-head]# npm install
[root@server1 elasticsearch-head]# npm run start &
[root@server1 elasticsearch-head]# netstat –anpt | grep 9100
[root@server1 elasticsearch-head]# netstat -tunlap| grep 9100
tcp        0      0 0.0.0.0:9100            0.0.0.0:*               LISTEN      330/grunt
[root@server1 elasticsearch-head]#
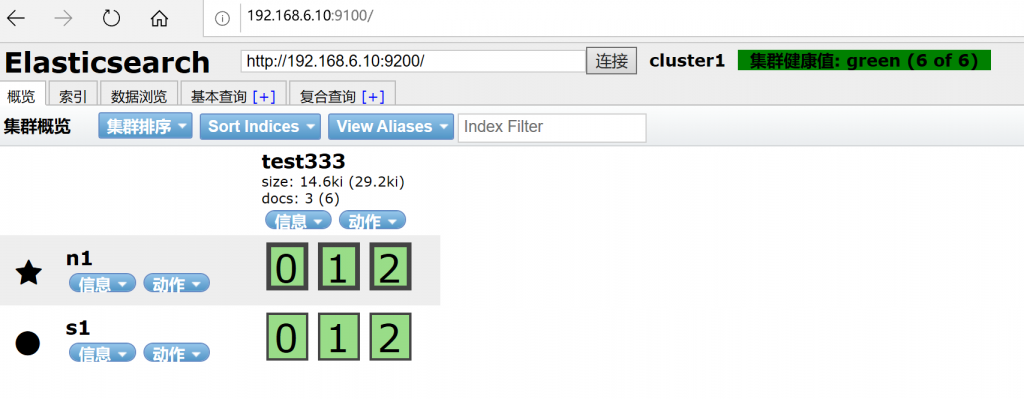
浏览器打开:192.168.6.10:9100,如果遇到无法连接到集群的情况,如下图这样

请在elasticsearch的配置文件中加入如下配置:
[root@server1 ~]# vim /etc/elasticsearch/elasticsearch.yml
http.cors.enabled: true
http.cors.allow-origin: "*"
重启服务即可连接。

我添加了一条索引3个分片,可以看到2个节点都在线,到此elasticsearch就简单的安装完成了。
如果需要访问加密的es集群,可以在url中加上用户名和密码的参数:
http://192.168.6.10:9100/?auth_user=elastic&auth_password=123@abc
 娃哈哈好喝
娃哈哈好喝